How to Teach About Weather Tools & Instruments
Ever looked up at the sky and wondered how on Earth (pun intended) we can predict if it’s going to rain tomorrow or if it’ll be sunny? Well, the secret’s in the tools. Today’s weather predictions come from some cool gadgets and instruments that make meteorology not just accurate but incredibly intriguing.
Ready to introduce your 5th graders to this atmospheric adventure? I’ve got your back. In this blog post, I’ll walk you through everything from objectives and essential questions to the nitty-gritty of lesson activities. So let’s work together to make weather-watching an educational blast!

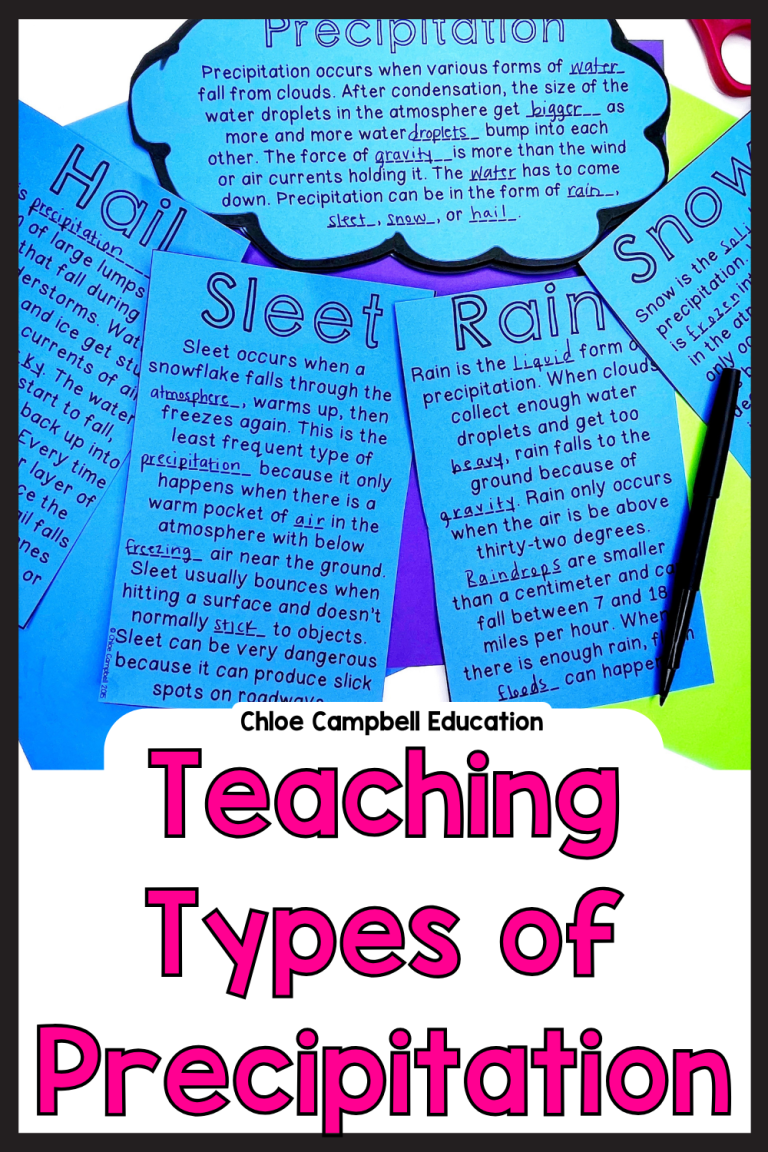
This is the second lesson of the weather unit. Check out the first lesson on types of precipitation here. Below, in the chart, you’ll find an estimated timeline and each of the lessons that will be covered throughout the weather unit.
| Weather Unit Lessons | Estimated Timeline |
| Types of Precipitation | Days 1 – 2 |
| Weather Tools | Day 3 – 6 |
| Climate Zones | Days 7 – 8 |
| Types of Clouds | Days 9 – 10 |
| Review Weather Unit & Assess | Days 11 – 15 |
Materials You Need:
- Copies of the weather tools foldable
- Scissors
- Weather Tools Matching Cards
- What Am I? Vocabulary Game
- Weather Data Collection Recording Sheets
- Examples of Weather Tools (if possible)
- Access to internet to look up weather in different locations
- Materials to make weather tools
- Create Your Own Weather Tools Step-by-Step Directions
- Weather Data Collection Recording Sheet: Compare Our Tools to Scientific Tools
- Weather Tools Mini Assessment
| Essential Questions | – How can you describe the purpose of the six weather tools? – How do the weather tools help us determine the weather in a particular place and time? – How does the air temperature, barometric pressure, humidity, wind speed and direction, and precipitation in a location determine the weather? |
| Learning Goal & Objective | – Students will be able to identify the tools that measure air temperature, barometric pressure, humidity, wind speed and direction, and precipitation. – Students will recognize how temperature, pressure, humidity, wind, and precipitation determine the weather in a particular place and time. |
| Florida Standard | SC.5.E.7.5 Recognize how air temperature, barometric pressure, humidity, wind speed and direction, and precipitation determine the weather in a particular place and time. |
| Lesson Overview | – Weather Tools Foldable Notes (Day 3 of Weather Unit) – Weather Tools Matching Game (Day 3 of Weather Unit) – What Am I? Game (Day 4 of Weather Unit) – Weather Data Collection: Compare Locations (Day 4 of Weather Unit) – Make Your Own Weather Tools (Day 5-6 of Weather Unit) – Test Your Tools Outside & Compare to Scientific Tools (Day 5-6 of Weather Unit) – Mini-Assessment on Weather Tools and Instruments (Day 6 of Weather Unit) |
| Higher Order Thinking Questions | – What is your favorite weather tool? Why? – What do you think is the most important weather tool? Why? – What do you think is the least important weather tool? Why? – How would you rank the weather tools from most important to least important? – What would happen if meteorologists used only one tool to predict the weather? – Why do you think knowing the barometric pressure of the air is important? |
Day 3 of Weather Unit / Day 1 of Teaching Weather Tools and Instruments
Start by reviewing the hands gestures that students created on Day 1 of the weather unit. Try to do this every day of the weather unit so that you keep it fresh in the students’ minds.
Weather Instruments Foldable Notes
Give students a copy of the weather tools foldable notes. Ask students to look at the pictures on the foldable. Have students make predictions with their teammates about these two questions: What do you think is the purpose of each tool? How do you think scientists use each tool to predict weather?

Go through each weather tool and talk about how scientists use the instruments. If you have a real life example of the tools, show them to students. (I’ve collected several over the years from PTSA grants in the past). Have students take a few notes about each weather tool inside the foldable notes. The answer key is here if you need specific ideas. If you don’t have any actual examples of the tools, this is a great time to find a few videos on YouTube, BrainPop, or some other education website (I say that like YouTube is educational-LOL).

If you would like to make this activity more student centered, have students read this text that explains each weather tool and its purpose. Then, based on what students have read, they can complete the foldable notes independently or with a partner.
Weather Tools Matching Game
It’s time to play a matching game! There are twelve cards (one for each tool and one for each definition). Soo many ways to play this game! Here are a few variations below:
–Traditional Matching: Students will spread out the cards face up. Then, students will match the tool name cards to the appropriate definition.
–Memory Game: Students will place all 12 cards face down in a grid. Students will take turns flipping over two cards at a time, trying to match a tool with its correct definition. If they find a match, the student will keep the cards and get another turn. If not, they flip the cards back over. The goal is to remember where each card is for successful matching.
–Timed Challenge: Mix up the tool cards and their definitions. Set a timer and challenge students to match them correctly as quickly as they can. This can be played individually or in teams.
–Relay Match: Divide students into teams. Place the tool cards at one end of the room and the definitions at the other. On “Go!”, the first student from each team races to match one tool with its definition, then runs back to tag the next teammate. The team that matches all cards correctly first wins.
–Charades-Inspired Match: One student randomly picks a tool card without showing anyone. They act out or mime the tool’s function (without using words) while others guess which tool it is. Once the tool is guessed, the group selects the corresponding definition.
–Interactive Scavenger Hunt: Hide the tool cards around the classroom or outdoor space. Provide students with the definitions and have them search for the corresponding tool cards.
Day 4 of Weather Unit / Day 2 of Teaching Weather Tools and Instruments
“What Am I” Game
Whenever we have new vocabulary cards, I love playing the game “What Am I?“. Students have cards taped to their back – as you tape the cards, don’t let students see what’s on their back! Students will stand up and walk to different classmates to ask questions about the card on their back. Example question: “Do I measure wind speed?”. The key here is that once students ask the question and the classmates says yes, the student has to guess the tool name that relates to the question they asked. If the student gets it correct, they can see the teacher for a new card on their back. If they don’t guess it correctly, they have to find a different classmate to ask another question.
Sometimes, I let students use their resources and carry around their foldable notes during the game. If we play the game again later during the unit, I won’t let students use their resources. I’ll also encourage them to look at the real life tools in our classroom to help remind them of the tool’s purpose.
Weather Data Collection: Compare Locations
-This is a long term investigation, meaning you’ll need to do this activity for a week or so. It only takes a few minutes to complete.
You’ll pick two locations – I suggest picking your current location and one other place that has different weather than what you are experiencing right now.
In the top box of the recording sheet, we’ll record the weather that is happening outside right now (using a website like weather.com). On the bottom, we’ll pick a place (as a class) in a completely different location. It’s important to do a place that will have different weather. Since I’m in Florida, my class chooses a place like Alaska or Canada. This will be a great teaching point when you start talking about the climate zones in a few days.
Day 5-6 of Weather Unit / Day 3-4 of Teaching Weather Tools and Instruments

Imagine this: Your students stepping into the great outdoors armed not with store-bought gadgets, but with weather tools they’ve crafted with their very own hands. The thrill of watching their homemade thermometer rise and fall, or their self-made anemometer twirl in the wind, is unparalleled.
But, how do these DIY tools compare to the real deal from the store? Well, that’s the adventure we’re about to embark on! We’ll dive into a hands-on lesson that not only educates students about the intricacies of weather tools but also lets their creative flags fly high. It’s science, it’s craft, it’s a weather showdown – DIY vs. Store-bought!
Designate 1-2 days of class time for students to get the chance to create their own weather tools (all but the hygrometer). This is where things can get tricky, but you know your students the best. Pick and choose the tools you want to make with your students AND how you give them time to create the weather tools. If you don’t have 2 days to dedicate, just select one tool to make in one day.
Here are a few ideas on how to structure the time of making the weather tools:
– Whole group, step-by-step, for each tool
– If you have parents or college students that can volunteer, maybe you’ll want to invite them to lead a small group in creating the tools
– Give directions handout for one or two weather tools and let the students follow the instructions and create their own tools (only recommended for students who are great at following directions!)

After you make one weather instrument, take students outside to test it. Take a clipboard and the recording sheet, “Weather Data Collection: Use the Tools You Made” form. Students will record their measurements using the weather tool they’ve created.
If you have access to scientific weather tools, students can use these tools to measure outside as well. If not, use a reputable website to help your students compare the weather they measured on their own tools vs the actual weather outside. This part takes less than 5 minutes, but allows students to the importance of being precise in science.
Not only is it important for students to get to create their own weather tools, but it’s essential for them to try the tools, too. They’ll learn a lot of the lessons by doing this activity:
– One lesson is that the weather tools need to be exact. Even though we can try our best to recreate weather tools, the best ones are made specifically for scientists.
-Another thing they’ll see as they use the tools is HOW it actually works. This will help students make the connection between the tool name, the tool purpose, and what it measures.
Weather Tools and Instruments Exit Slip Question Ideas:
- What are the six weather tools and what do they measure?
- How are anemometers and wind vanes different?
- What does a hygrometer tell us about the air?
- What tools would a meteorologist use to predict a storm approaching?
- What is your favorite weather tool? Why?
- What weather instrument measures atmospheric pressure and why is this tool important?
- Which weather tool do you think would be the most interesting to observe for a week? Why?

Mini-Assessment
At the end of these lessons on weather tools and instruments, give students the Weather Tools mini-assessment. Students will write the purpose of each weather tool. If you’d like an extension activity, you can even have students describe how the tool helps us predict weather.
Love this lesson?
Get everything for the types of weather tools lesson here OR get all the weather activities done for you here!
Save this Science Lesson!
Pin these ideas to your favorite classroom Pinterest board. Then you can come back whenever you need ideas or inspiration!